March 2017

Thursday, 30 March 2017

Googley Eyes Review And Giveaway

Googley Eyes game

I am pleased to report that Googley Eyes is a fun family game that we all love. Infact the boys haven't stopped asking to play it since we were sent it to review. The game is aged at children 7+ so I wasn't expecting little man to be able to join in. However, he wasn't going to miss out on the fun and with a bit of help had a go.

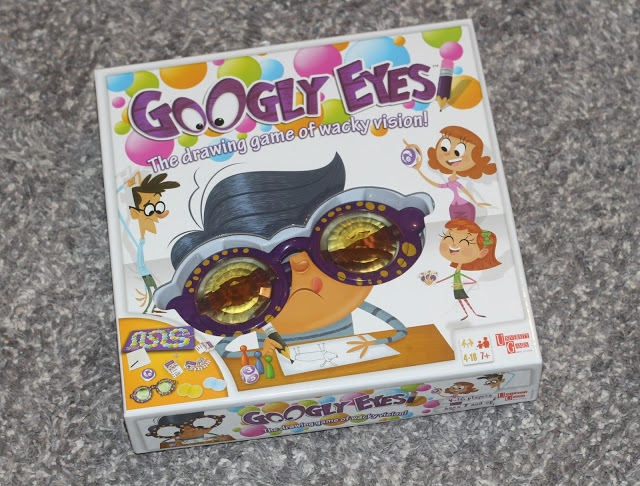
In essence it is a drawing game, where you don a wacky pair of oversized glasses with varying lenses to obscure your vision. Drawing prompts are divided into places, objects and entertainment. Each card has three choices, easy, medium and hard and the board dictates which you choose. You then change the lenses in the glasses to match and start the timer to draw your picture for your team mates to guess.

spongebob drawing


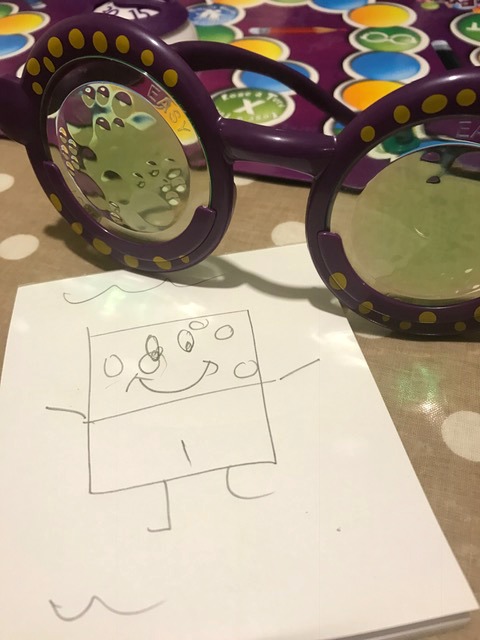
Here is a little vlog I made so that you get the gist.


I really like Googley eyes as it is fun and the boys enjoy it. The only thing we found is that as our guessing was so rubbish (and our boys are quite young) we shortened the game a bit or it would have gone on forever. You can purchase it from Amazon.


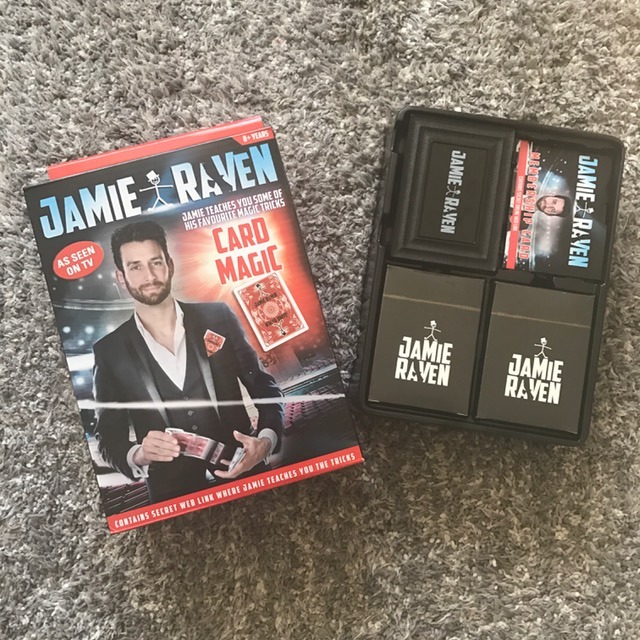
If you are looking for a fun gift for Easter for a child 8+ then I would recommend this fun game. I am also excited to be able to offer one of my readers the chance to win a game for themselves. Just complete the Gleam entry below. Good Luck!

Googley Eyes Game Landing Page (Automatic)


SuperLucky Blog Giveaway Linky


Listed on Prizefinder

Tuesday, 28 March 2017

Win A Series 3 Num Noms Bundle

When it comes to little collectibles middle and little man love them. Little man is all into food and the new series of Num Noms would be right up his street even though at first impressions they may be aimed more at girls. However, with our house jam filled with boxes at the moment for our impending move, I can't take on any more reviews. So I thought I would spread some joy with a giveaway for my readers instead.


Last year was the year of the Num Noms, with the collectable, scented craze making its way into households across the UK. 2017 sees the launch of Series 3 and Lights, bringing brand new food themes and funky characters to the shelves, to create even more ways to collect. The Num Noms Starter Pack retails at around £8.99 and has themes including Glazed Donuts, Marshmallows, Fresh Fruit and Hard Candies. Each starter pack contains three scented Nums, Stamp-it Nom, cup, accessory and collector’s menu.


The Num Noms Lunch Box Deluxe Pack pictured above retails at around £14.99. Here you can store your Num Noms.The case includes 10 scented Nums, one mystery Num, two scented Nom erasers, stamper and collector’s menu.


Like surprises? Then the Num Noms mystery pot is for you. Each pot includes a Num and a 2-flavoured lip gloss which also works as a pencil topper! Keep an eye out for special edition characters and if you’re lucky you may find a glitter marshmallow or a mystery scented candy!


Num Noms Series 3 and Num Noms Series 1 Lights are for children aged 3+ and are available from all good toy retailers including ToysRUs, Smyths and The Entertainer. For more information, visit www.numnoms.com

I am delighted to be able to offer one of my readers a prize bundle which includes 1 x Num Noms Deluxe Lunch Box, 1 x Num Noms Starter Packs, and 1 x Num Noms Mystery Pot. Just complete the gleam entry below. Good Luck!

Num Noms Series 3 Bundle


SuperLucky Blog Giveaway Linky

Listed on Prizefinder

Monday, 27 March 2017

Rombouts Coffee Review And Giveaway

On Sunday morning, my husband turned to me and said "this coffee is good." I agreed and said I actually have no idea how much it costs though. Cost is generally a factor on whether I would actually buy coffee and when I looked up to see that the Rombouts Laos single origin ground coffee was only 50p more expensive than my usual coffee brand I was pleasantly surprised.

Rombouts coffee


Rombouts are a family company that were established in 1869 when Frans Rombouts rented a roasting cylinder and began roasting coffee in Antwerp.  I was pleased to read that each year, Rombouts is increasing its commitment to Fair Trade in order to support the quality of life of small producers through its Max Havelaar label product line.

Rombouts sent me a variety of products from their ground and one cup range to try. They also sell pods if you have one of those machines. I have to say I have enjoyed all of them. I really liked was the one cup filters and they were not a product I would have usually bought. I am a total coffee snob and will not drink instant. Infact if I go round someones house and know they would serve me instant I will ask for tea. Obviously, it is not always easy to have ground coffee though. For instance when I used to work as a teacher, I would drink tea as the staff room wasn't really equipped with much more than a kettle. These filters would have been perfect. You just give the filter a little shake, pour in the hot water and wait for the coffee to drip through. I am thinking it would also be great to have if you travel. Most hotels only have instant, and they would also be great for self catering holidays.

Both me and my husband really enjoyed our selection of Rombouts coffee and it is certainly a brand I will look at buying in the future. If you fancy trying it, Rombouts are offering a generous selection to one of my readers too. Just complete the Gleam entry below. Good Luck! Rombouts Coffee Bundle


SuperLucky Blog Giveaway Linky

Listed on Prizefinder

Friday, 24 March 2017

Fried Egg Biscuits For Easter

With Easter around the corner, why not make some fried egg biscuits as a fun Easter treat. I originally bought the yellow candy melt "yolks" to use to make some chicken cake pops. However, a trial run made me realise that whilst bunny butt cake pops are easy, chickens are a bit more tricky. I therefore thought I would make some fried eggs instead and try out using royal icing for the first time.

fried egg biscuits

I used a standard shortbread type biscuit recipe and used a flower cutter to cut out the shapes. The hardest part was keeping the dough cold or it gets a bit sticky. Once baked and cooled I used royal icing to decorate. It was the first time I had used royal icing, but I am now keen to try something harder. I used the icing out of the container in a piping bag to make the egg shape. Then to fill I mixed some royal icing with water to thin it and filled in the outline.

fried egg biscuits


Fried Egg Biscuits


  • 200g butter
  • 200g caster sugar
  • 400g plain flour
  • 1 egg
  • 1 tub of royal icing (I used renshaw)
  • 1 packet of yellow candy melts
  1. Cream the butter and sugar togther 
  2. Using a mixer add the flour and egg and mix until a dough is formed.
  3. Chill for 10 minutes in the fridge
  4. Roll out the dough and cut out flower shapes and lay onto baking parchment.
  5. Put back in the fridge for 10 minutes
  6. Bake in a pre heated oven (180C) for around 12 minutes
  7. Once cool pipe royal icing roughly around the edge of the biscuit. Use the edge as a guide, but you don't want to be precise as it will look too precise for an egg.
  8. Mix a little water with some royal icing to make it thinner and use this to fill in the outlines.
  9. Add a candy melt to the top of each egg, slightly to one side.
Don't forget to check out my other easy Easter bakes, including MaltEaster bunny cupcakes, bunny butt cake pops and a buuny butt cake using a tunnocks tea cake.

Pin it for later:

Easy to make fried egg biscuits

Thursday, 23 March 2017

Jamie Raven Card Magic Review

When I saw the Jamie Raven Card Magic set, I knew that big man would love it. He didn't watch Britain's Got Talent so wasn't aware of who Jamie was, but what 9 year old boy doesn't like magic tricks. The set is small and focused on card tricks, other sets in the series include magic of the mind, sleight of hand and street magic.

Jamie Raven Card Tricks

On opening the box I was initially shocked that there were no instructions. To be honest I was a little disappointed that big man would need to access the internet in order to learn how to do the trick. However, I was wrong. This is the beauty of the set. How many times have you tried to work out the instructions on how to do a trick? It isn't easy reading instructions and trying to work out what to do. A video tutorial is infact much easier to follow.

I signed up on the website and gave my email. I was then sent the password to access how to do the tricks and set big man off on his own.

In about half an hour he came downstairs and was beaming from ear to ear after he performed his first card trick for me.

Jamie Raven Card Tricks set


Here is a little vlog we have made.


I am really impressed with the kit, as is big man. He now has the other magic sets in the series on his Birthday present list! Oh and he would also like to see Jamie Raven on tour.

You can purchase the Jamie Raven Card Magic from Amazon


We received Jamie Raven Card Magic in return for an honest review

Monday, 20 March 2017

Parmesan Chicken In Bolognese Sauce

Parmesan chicken using Dolmio Bolognase sauce

I would love to tell you that as a Mum and someone who posts A LOT of recipes on her blog, I always cook from scratch. That would be a total lie. It takes a long time to cook from scratch, and when you have three hungry kids, have just been to 2 different after school clubs, you want/need to make life easy. Why do all the hard work when someone else can do it for you? Sometimes us Mums need to help ourselves a bit. That is where Dolmio come in. They have challenged bloggers to come up with some simple week night recipes using their Bolognese sauce.

Now I know that some people are worried that if they buy a jar of sauce, they don't know what is going in it. Well here are Dolmio showing you how it is done (ok maybe on a smaller scale!)


I have to admit that I am sure I read somewhere that there was loads of sugar in a jar of Dolmio, but there is just 2 teaspoons of sugar beet in there. The best thing about Dolmio Bolognese  sauce for me is it's versatility. It can be used for Bolognese  as the name suggests, but it can also be used in lasagne, meatballs and a whole array of other dishes.

Dolmio kindly sent me a hamper of food and for one meal (at little man's request) we had slow cooked meatballs using the Domio as the sauce and adding some mushrooms and courgettes too. I kid you not, middle man asked for thirds!

I decided that I would use the other jar to make a Parmesan chicken dish. When the boys were younger I used to chop the vegetables really small so that they couldn't see them and complain. Thankfully now they are older they are usually less fussy and more willing to try new things. Plates were clean so everyone including me was happy!


Parmesan Chicken In Bolognese Sauce 

  • 4 chicken breasts
  • 25g grated Parmesan plus extra to top if you wish
  • 1 slice of bread 
  • 1 medium egg
  • 1 small aubergine peeled and sliced
  • 1 courgette sliced
  • 2 garlic cloves chopped
  • 1 small onion chopped
  • 1 jar of Dolmio Bolognese Sauce
  1. Pre heat the oven to 180C
  2. Using a food processor use a slice of bread to make breadcrumbs.
  3. Add 25g of grated Parmesan
  4. Dip the chicken in the egg and then coat in the Parmesan and breadcrumb mix
  5. Place in an oven dish and cook for 15-20 mins
  6. Use this time to fry the courgette, garlic, aubergine and onion so that it is soft.
  7. When the chicken is nearly cooked through add the vegetables on top of the chicken and then the jar of Dolmio Bolognese sauce.Top with some more cheese if desired and put back in the oven for around 5 minutes.
  8. This dish is lovely served with jacket potato, chips, rice or pasta.

For me being a Mum is about serving my boys food that they will eat which is also good for them. #Thankgoodness for Dolmio for helping me save some time in the kitchen on weeknights.


Pin it for later:

easy to make midweek meal, paremesan chicken in bolognese sauce


This post is an entry for the #Dolmio #ThankGoodness Challenge, sponsored by Dolmio. www.dolmio.co.uk/thankgoodness.


Wednesday, 15 March 2017

Unicorn Cupcake Tutorial

Who doesn't love unicorns? My sister even saw one once! Ok, it may have been a goat, but even so, I think unicorns are kind of cute. I have been watching This Morning whilst having my lunch recently and there have been unicorn bakes galore. I therefore decided I would be on trend (not something I say very often) and bake something less minecraft/pokemon for a change!

easy to make unicorn cupcakes

I went through my cupboards and found some coloured icing, smarties, sugar flowers and stars that I could use for decoration. Oh and some edible glitter as unicorns need a bit of sparkle. I decided to use coloured sponge for a bit of fun and again used the coloured gels I already had. All I did was divide my cupcake mixture into three and spoon the three colours into the cases.

unicorn cupcake

I prepared my icing with CMC as this just makes it go hard and keep the shapes I wanted. I made all the horns and allowed them to harden before adding glitter using edible glue.


Unicorn Cupcakes


  • 4oz self raising flour
  • 2 eggs
  • 4oz caster sugar
  • 4oz margarine
  • 5oz butter
  • 10oz icing sugar
  • ready rolled icing in white, pink, blue and peach
  • sugar decorations - I used smarties, flowers and stars
  • food colour gels
  • chocolate writing icing pen 
  1. Mix the self raising flour, eggs, caster sugar and margarine together.
  2. Split into three bowls and add different colour gels to each.
  3. Add a small spoon of each colour into each cake case (this makes 10 cupcakes)
  4. Bake at 180C until a skewer comes out clean and allow to cool.
  5. Mix the butter and icing sugar together and add some food colouring if you wish.
  6. Top each cake with buttercream
  7. Cut a circle of white icing slightly bigger than the top of the cupcake case and places this over the butter icing in a dome.
  8. Using the peach icing make a horn shape. Add edible glitter using edible glue.
  9. Roll thin sausage shapes with the blue and pink icing and arrange it around the horn as a mane.
  10. Add smarties, flowers and stars to cover any joins.
  11. Use a writing icing pen to give your unicorns some lovely eyebrows!
  12. Make two holes on the icing using the end of a paintbrush to make the nostrils.

unicorn cupcakes


Pin it for later:
easy to make unicorn cupcakes


Casa Costello


Monday, 13 March 2017

Bunny Butt Cake Pops For Easter

I hate to say it but Easter is around the corner (seriously it was only Christmas yesterday) and these bunny butt cake pops are sure to put a smile on everyone's face.

Bunny butt cake pop


Cake pops are easy to make, once you know how to make them. The key is not to rush and to keep cooling them. It is so much easier to make them if they are cold. Another tip is not to make the balls too big. The heavier they are, the more likely they are to break.

Cake pops are also great to make if you are sculpting a celebration cake and have a lot of excess trimming. I always like to make use of my leftovers - especially when it comes to cake!


Bunny Butt Cake Pops


  • 3 plain cupcakes
  • 2tbsp chocolate frosting
  • chocolate cake covering or candy melts
  • chocolate flavoured icing
  • white mini marshmallows
  • Pink icing
  • cake pop sticks
  1. Crumble the cupcakes into a bowl and add the chocolate frosting. 
  2. Mix thoroughly and then roll into small balls. Chill in the fridge for 15 minutes.
  3. Melt a small amount of cake covering. Dip the cake pop stick into the chocolate and then into the cake ball. 
  4. Place these into the freezer for 20 minutes to harden.
  5. Meanwhile make feet shape using the chocolate icing. Add detail with pink icing.
  6. Take the cake pops out of the freezer and dip into a pot of melted chocolate covering. Shake off any excess.
  7. Use a small dot of chocolate to "glue" a white marshmallow on the top of the cake pop as a tail.
  8. Use some more melted chocolate to attach the feet.

There you have some cute bunny but cake pops for Easter. Need some more ideas? 


Malteaser Cupcakes

Or a Bunny Butt Cake using a Tunnocks Tea cake and mini eggs to decorate.

Bunny Butt cake


Pin it for later:

Easy to make bunny butt cake pops with a mini marshallow tail


Casa Costello


Thursday, 9 March 2017

Lamb Dhansak: Friday Night Fakeaway

This lamb Dhansak curry tastes delcious and is easy to make. I love curry and Friday night is our curry night. I would love to have a takeaway every week but there are two things stopping me. 1.It is expensive and 2. it isn't that healthy. I have therefore decided to make more of an effort to make more of my own healthier curries.

lamb dhansak


Recently, I reviewed a Date Delivered subscription box which contained a spice box from The Spicery. Inside amongst lots of treats was a recipe for a lamb dansak. I have played around with it a bit and come up with this one. It serves 2-3 depending, depending on how many accompaniments you have with it.

lamb dhansak


Lamb Dansak


  • 300g diced leg of lamb
  • 1 large tin of chopped tomatoes
  • 2 cloves of garlic crushed
  • 1cm cubed of ginger chopped
  • 1 small red onion chopped
  • 1tbsp curry powder
  • 2tbsp brown sauce
  • 50g dried red lentils
  1. Chop the red onion and fry in coconut oil until soft.
  2. Add the garlic, ginger and lamb and cook to seal the meat.
  3. Add the rest of the ingredients plus 300ml water.
  4. Cover the pan and simmer until the meat is soft. This will take an hour to an hour and a half. You may need to add a little more water if the sauce is getting too thick.
  5. Serve with rice and fresh coriander to garnish.
What is your favourite dish to have on a Friday night?

Pin it for later:

lamb dhansak curry with red lentils served with rice, poppadoms and naan bread


Link up your recipe of the week

Wednesday, 8 March 2017

Have Your Cake And Eat It Review And Giveaway

Have your cake and eat it is the new book from Mich Turner MBE founder of Little Venice Cake Company. The idea behind the book is that the bakes included are more nutritious and healthier than your average bake. This generally means that the bakes include fresh and dried fruit, along with nuts and seeds.

Have your cake and eat it recipe book

The photography in the book is inviting and makes you want to get baking. I decided to try the plum and nectarine upside down cake. I would love to show you a picture, but I'm afraid it didn't go quite to plan. Not the books fault I might add. Just mine. I used a slightly smaller cake tin than recommended (note I did not listen to Eric) which resulted in a well cooked cake on the sides and top, but not cooked in the middle. Not to worry, I served it us as plum and nectarine mash cake and my boys were more than happy with the result! The recipe didn't use less fat or sugar than I would normally use in such a recipe, but it did contain fruit. I guess life is all about moderation and if you have some cake with your fruit it is ok.

plum upside down cake recipe

At the front of the book, there is a section on ingredients as well as cake dos and don'ts. This covers the different terms in making and some handy advice on sugar temperatures.

The book is then split into sections including muffins and cupcakes, biscuits, flapjacks, cakes and meringues. There are recipes for both the novice and experienced baker.

I will certainly be trying out some more of these bakes in the future and I like the idea of combining fruit and nuts into a bake to make it a slightly healthier treat. You can purchase Have Your Cake And Eat It From Amazon.


I am also excited to announce that I have a copy of the book to giveaway to one of my readers. Just complete the Gleam entry below. Good Luck!

Have Your Cake And Eat It


SuperLucky Blog Giveaway Linky

Listed on Prizefinder

Tuesday, 7 March 2017

A Red Letter Day With Cake Boy Eric Lanlard

Regular readers will know that I like to bake. So imagine my excitement when I went up to London to cupcake decorate with master patissier himself, Eric Lanlard. As a Red Letter Ambassador I was there to try out two of their experiences. cupcake decorating with Eric and champagne afternoon tea at Cake Boy. 

Interviewing Eric Lanlard
Photo credit RLD

Before the rest of the bloggers joined us, I had the chance with fellow ambassador, Kip Hakes, to interview Eric. I always worry about things like this as:
 1. I worry I will forget my questions (luckily Kip was on hand to help me out of that situation!)
 2. What if it turns out that Eric isn't as nice as he comes across on TV?
Luckily I had nothing to worry about as he was charismatic and down to earth. We chatted about the types of cake he suggested for a novice baker. He said that it was important to follow the recipe (note to self) and start with simple dishes. Maybe a fridge cake with the kids, then brownies and tray bakes.


When it comes to celebrity cakes, he made a point of saying that all customers are celebrities to them. He did, however, mention how proud he was to have made a Birthday cake for the Queen Mother, and even met her, out of the blue whilst he was delivering it.

As I follow Eric on Instagram I was keen to find out how his travels influence his baking. He always seems to be somewhere exotic. He pointed to the cake before me and said that the small lychee balls on this rather stunning strawberry mousse where inspired by a trip to Austrailia. He did point out that he never copies others work, just takes ideas which develop into something new.

cake decorating at cake boy
Image credit RLD

Next up was our cupcake decorating course taster. Here Eric showed us how to mould cake decorations using petal paste and silicon moulds, before paining them and adding glitter. You know when someone makes it look so easy? Well it was like that! Much harder than he made it look, but it got easier with each design.

We were then handed some different flavoured cupcakes and shown how to frost them. Here are my beauties. Lets just say my boys were extremely excited when I walked through the door holding these!


Next up was afternoon tea. And it was afternoon tea with a difference. Forget tiny little finger sandwiches. There were mini filled croissants, focaccia and ciabattina.


afternoon tea cake boy
Image credit RLD

The petit fours included a mini berry waffle cone and wild berry "Magnum"

afternoon tea cake boy
Image credit RLD
As Eric had recommended the liquroice macaroons, I had to give them a try. Subtle rather than over powering in flavour and absolutely delicious.

liquorice macaroon


Washed down with a glass of champagne and a black tea, it was a real treat which anyone with a sweet tooth would enjoy.

Cake Boy is based in Battersea, a short walk from Clapham junction. Thanks to Eric and the Red Letter Days team for such a fantastic Red Letter Day. Check out the Red Letter Days website for more fantastic experiences.


champagne afternoon tea at Cake Boy


Wednesday, 1 March 2017

Cinnamon and Cocoa Bars

These cinnamon and cocoa bars are perfect with a cup of coffee. I was sent the original recipe along with some goodies from Three Sixty Coffee earlier this year and have only just got around to making them. Now I have tasted them, I am going to have to try some more variations soon!

porridge bars


I was also treated to Three Sixty Guatemala Antigua coffee and Organic Peru coffee. Both tasted smooth and full of flavour. It was nice to try some different flavours, rather than stick to my regular coffee. Three Sixty Coffee is stocked in Waitrose.


These cinnamon and cocoa bars are delicious. I had to vary the recipe from the original, as it turned out my baking cupboard wasn't as stocked up as I thought. However, that is the beauty of these bars. You can swap ingredients about to make them taste as you want. Maybe swap he cocoa nibs for dried fruits. Or half the quantity and add nuts. You can make them tastes as you want.

Cinnamon and Cocoa Bars


  • 175g porridge oats
  • 5g cinnamon
  • 15g cacao nibs
  • 75g butter
  • 50g muscavado sugar
  • 35g golden syrup
  1. Warm the cocoa nibs in an oven at 130C for 10 mins.
  2. Melt the butter and golden syrup together in a pan.
  3. Stir in the rest of the ingredients, including the roasted cocoa nibs.
  4. Line a small loaf tin with baking parchment and add the mixture and press down.
  5. Bake at 150C for 20 minutes
  6. Allow to cool and cut into slices.
  7. Enjoy with your favourite Three Sixty Coffee.
Pin it for later:

Cinnamon and cocoa oat bars. Easy to make and go well with coffee