February 2017

Friday, 24 February 2017

How To Make A Pokeball Cake: Middle Man Turns 7

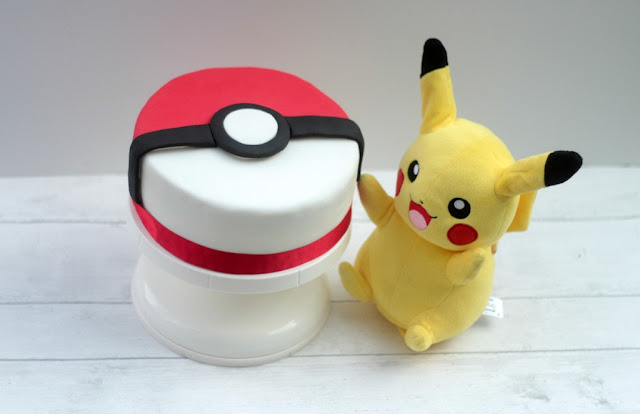
A Pokeball cake was top of middle man's list when it came to planning his 7th Birthday. Middle man loves Pokemon go, and as it gets him out of the house and walking around we are fine in indulging him in it every now and then.

pokeball cake

It seems that turning 7 is very exciting. We have literally been on a countdown to it from Boxing Day. His Birthday list was full of Lego and he has spent most of his half term assembling his sets. Every now and then he calls me up to find a missing piece and show me a special feature. It makes my heart melt.

We celebrated his Birthday with a family swim, followed by Pizza Hut. He had asked if we could do MacDonalds, Kentucky Fried Chicken and Pizza Hut in one day, just like the song. We felt that was a little excessive!

For his party, he chose a gynmastics centre and had his friends over. He beamed from ear to ear.

homemade pokeball cake

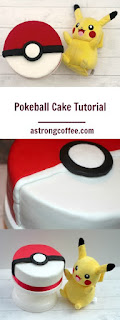
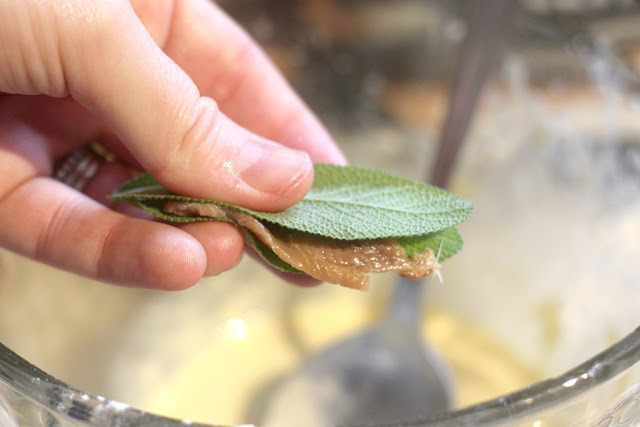
Luckily, his choice of cake wasn't too hard. As half term was sandwiched inbetween his Birthday and his party, I didn't have much time to make it.  This picture shows you how I leveled the icing up, which I think is the easiest way of attempting a pokeball cake.

how to make a pokeball cake

Pokeball Cake Tutorial


Serves 20+ Children

For the cake
  • 10 oz butter
  • 10 oz caster sugar
  • 6 eggs
  • 12 oz self raising flour
For the decoration
  • 8oz icing sugar
  • 4oz butter
  • strawberry jam
  • 750g ready to roll white icing
  • 500g ready to roll red icing
  • 250g ready to roll black icing
  • CMC to prepare the black icing is optional (1/4 tablespoon of CMC to every 100g.)
  1. Preheat the oven to 180C. 
  2. Mix all the cake ingredients together. I find that it is easier if the butter is melted in the microwave first.
  3. Divide the mixture between two 20cm spring form tins that have been greased and lined with baking parchment.
  4. Bake until a skewer comes out clean. Allow to cool before adding the frosting.
  5. To make the  frosting mix the icing sugar and butter together using an electric whisk. 
  6. Sandwich the cakes together with a layer of buttercream and jam in the middle.
  7. Spread butter cream over the top of the cake and sides. Scrape off any excess so that the sides are smooth and flat. Place in the fridge for 30mins to harden.
  8. Roll out the white icing so it is large enough to cover your cake. Place on top and smooth out.
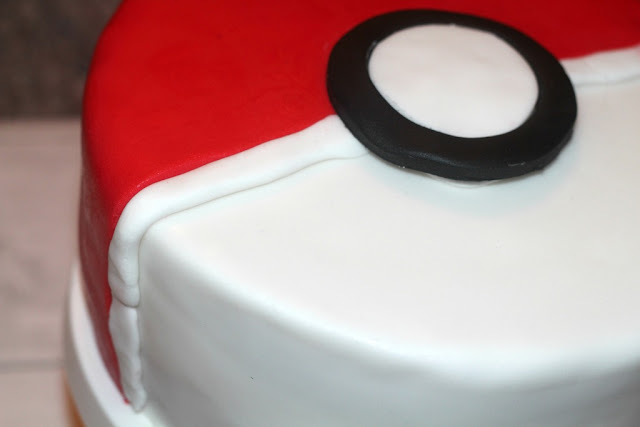
  9. Roll out the red icing so that it will cover half of your cake. Cut a straight line and place it over half of your cake.
  10. Use white icing to level the cake where the black middle and centre will go.
  11. Cut out a circle of black icing and cut a smaller circle in the centre. Replace this with a white circle of the same size.
  12. Roll out a long black strip. Cut the end with the large circle cutter so it fits to the circle in the centre. 
  13. Add ribbon around the bottom of the cake if desired.

I am pleased to say I now have a break from baking birthday cakes for a while! 

What do your children ask for, for their Birthday cakes?


Pin it for later:

Easy to make pokeball cake tutorial for a pokemon go fan


Wednesday, 22 February 2017

3 Ingredient Plum Tarts

These 3 ingredient plum tarts are delicious hot or cold and are so simple to make. One of the things I love about blogging is that sometimes you get a surprise package. As the delivery driver turned up on Valentine's Day, I was wondering what I had been sent. I was pretty sure that it wasn't anything from my husband as we had agreed we would have a takeaway to declare our love for each other! A smile came to my face when it was some plums from SA Stonefruit. 

3 ingredient plum tarts

I love plums, but it is one of those fruits I don't buy very often. After this delivery, I am not sure why.
I decided to make some simple tarts. They are delicious warm with some vanilla ice cream, but equally as tasty when cold. More like a danish pasty then.


3 Ingredient Plum Tarts


  • Ready rolled puff pastry
  • Marzipan
  • Plums (each tart uses half a plum.)
  1. Use a cookie cutter to cut out some puff pasty circles.
  2. Roll out a thin layer of marzipan and use a smaller cutter to cut out a circle.
  3. Place this on top of the puff pastry.
  4. Cut each plum in half and then into 4 or 5 slices.
  5. Place one slice on the marzipan and then arrange the remaining ones in a fan shape.
  6. Cook as per puff pastry guidelines. (I baked mine at 220C for around 18 minutes.)
  7. Enjoy warm with a scoop of vanilla ice cream. Or cold with a nice cup of tea.
3 ingredient plum tarts. So easy to make using plums, puff pastry and marzipan.

For more recipe inspiration, check out these recipes.

Sunday, 19 February 2017

Hans Solo World Book Day Costume and A Star Wars Giveaway!

The hardest thing about making this Hans Solo costume for World Book Day was keeping little man still. With a water gun in his hands he just wanted to leap around shooting baddies!


hans solo world book day costume


Egmont have challenged myself along with some other bloggers to come up with some Star Wars outfits for World Book Day. My boys love Star Wars, but I was a bit stumped with an easy to make outfit. So I went on a hunt around the house to see what we had that I could use. When I found a suit that little man had worn for my sisters wedding in his wardrobe, Hans Solo sprung to mind.


hans solo dress up

I grabbed a pair of Wellington boots, skinny jeans, white shirt, an old belt and a Quixels gun and started assembling the outfit. You can see exactly what I did in this short video:


As you can see from the photos, little man is one happy Hans Solo! If you don't have black wellies, maybe you have some girls boots that could be used instead. No white shirt? Maybe a karate top. Having a good look around your house can really put ideas into your head.


hans solo belt


In celebration of World Book day Egmont Publishing have offered me a set of the Star Wars Adventures in Wild Space Books to giveaway to one of my readers.


wild in space book


Big man has just started the series by reading The Snare. The first page sets the scene explaining that the Clone Wars have ended and the Jedi order has been destroyed. The evil Emperor Palpatine is the unopposed leader of the galaxy. The book focuses on Milo and Lina who are the children of the captured Imperial Captain Korda. Milo and Lina set out in their starship Whisper Bird to rescue their parents. But with the Imperial forces lying in wait, can they escape the snare.

The Nest: Still looking for their parents, Milo and Lina Graf need some help. They trace their latest clue to the jungle, where a terrifying adventure unfolds.

The Steal: Still on the hunt to find their kidnapped parents, Milo and Lina have something special stolen from them and have to embark on their most dangerous mission yet.

The Dark: In this story Milo and Lina are adrift on a starship that is spiraling towards disaster. Not to mention the fact that there is a criminal on the loose and the Empire are closing in. But something deadlier awaits them - the dark.

The books are aimed at confident readers from around aged 8 upwards. Big man struggled at first with the concept of the books as they focus on different characters from the films he has seen. However, a Star Wars fan sure to be won over by these new adventures in wild space. The books can be purchased from Amazon.


And you can pre order the lastest in the series which is out this March


And there is a new title that you can pre order to receive in March: The Cold. Still looking for their kidnapped parents, Milo and Lina are left them stranded on a desolate ice planet after an ambush. With an old enemy out for revenge, can they survive THE COLD?


To win a set of  Star Wars Wild In Space Adventures, just complete the Gleam entry below. Good Luck!


Star Wars Wild In Space Adventures

If you are, or know a Star Wars fan, then Egmont Publishing really do have a book for everyone. From fact files to adult colouring you can see their full range here.

Need some more inspiration? Here Eileen has made R2D2 and Angela will be showing you how to make Yoda.


SuperLucky Blog Giveaway Linky


This is a commissioned post

Thursday, 16 February 2017

Fried Sage And Anchovies

I first tried deep fried sage and anchovies when I attended a Red Letter Days Cookery Class at Caldessi Cookery School in London last year. It was a Tuscan Cookery Class. To be brutally honest, I was a little disappointed it was on the menu. I don't mind anchovies, on a pizza. But who eats them at a dinner party? Tuscan people do! And do you know why? Because they are absolutely delicious! 

Whilst I didn't have any 00 flour, which is recommended, plain flour can be used and the results are good. My eldest son had been asking to try some anchovies as he had seen some in the cupboard that I had reviewed recently. I thought this was the perfect chance to recreate the dish that I had eaten at Caldessi.

sage anchovies


Fried Sage And Anchovies


  • 2 heaped tablespoons of plain flour
  • 1 egg
  • 1 cup of milk
  • salt and pepper
  • large sage leaves
  • 1 jar of delicius anchovies
  1. Mix the egg and flour together and then whisk in the milk. I used a cup of semi skimmed milk. The batter is quite light, you don't want it too think and heavy.
  2. Add a little salt and pepper.
  3. Add some oil to a pan and heat it up. (Grape seed oil is recommended but I used vegetable oil.) Add a drop of batter to check that the oil is hot enough.
  4. Take the anchovies out of the jar and make sure they are dried on some kitchen towel. Depending on the size of your sage leaves you may want to cut the anchovies in half.
  5. Sandwich an anchovy between two sage leaves and then dip it in the batter.
  6. Fry until a light golden brown.
  7. Allow to rest on some kitchen towel to get rid of excess fat.
  8. Enjoy whilst warm.
fried sage anchovies

I was pleased to say that my 9 year old loved these as much as I did. I am hoping that we may see them on our trip to Italy later this year.

What is your favourite Tuscan food?

Pin it for later:

deep fried sage and anchovies from a tuscan dinner party menu


Monday, 13 February 2017

Courgetti With Pesto And Manchego

I devised this courgetti recipe after AO.com challenged me to make a healthy but exciting dish using the Kenwood Electric Spiralizer. My husband isn't a fan of having a meat free dish, and when I told him that it would also be pasta free he was even less pleased! He was worried that courgetti just wouldn't cut it. Luckily, by using some of his favourite flavours, I soon changed his mind.

Courgetti With Pesto And Manchego, a tasty healthy meal

I am still getting to grips with my Kenwood electric spiraliser. You can see it in action here:


The biggest tip I have for using the  machine is to make sure your vegetables are fresh and as straight as possible. Results aren't great if the vegetables have been sitting around for a while. The spiralizer is easy to clean with the detachable parts being dishwasher safe.


Courgettes have been hard to come by in recent weeks, but I was pleased to be able to get some last weekend. I used the linguine blade to make the courgette ribbons and was pleased with the results,


Courgetti With Pesto And Manchego


Serves 2
  • 2 courgettes
  • 2 tsps reduced fat red pesto
  • 1 clove of crushed garlic
  • A handful of olives, sliced
  • 3 sundried tomatoes chopped
  • 50g manchego cheese cubed
  • Chilli flakes
  1. Spiralize the courgettes. 
  2. Steam in the microwave for 2-3minutes.
  3. Add the pesto and garlic to a frying pan and heat through. 
  4. Add the Olives and sundried tomatoes.
  5. Add the courgetti and make sure that it is coasted in the pesto.
  6. Add the small cubes of manchego cheese.
  7. Divide between 2 bowls and top with some chilli flakes.

This meal was delicious and both my husband and I are looking forward to trying some more healthy meals with it.

Do you have a spiralizer? What recipes do you recommend?

Pin it for later:
Courgetti With Pesto And Manchego, a tasty healthy meal


Monday, 6 February 2017

Monday Morning Super Powers. What Are Your npower Parenting Super Powers?


Our usual Monday morning starts something like this:

Mummy where is my book bag?


Mummy where is my water bottle?


Mummy I haven't got a school jumper.


Mummy where is my Maths homework?


Mummy where are my trainers?


Mummy my school shoes have disappeared!


Pretty much every week, we have this scenario. All before 7.30am. Sometimes it is even before I have had my coffee. With three small boys there are a lot of Mummy where is questions.


By 8 o'clock I have found 20 missing items. Then I walk into middle man's room to make sure he is dressed. Of course he never is. He is usually sat in his pants, surrounded by Lego and reading his Pokemon encyclopedia.

"Why aren't you dressed?" I shriek.

"I can't find my school uniform."


"Argh! It is in your wardrobe where it always is!"


"Oh, I didn't see it there." he says nonchalantly, whilst flicking over the page of his book.


I won't lie, when I was little I never thought I would have good vision. Two eye operations before the age of 7. A patch like a pirate. I was told that as I had a squint I would never be able to pilot a plane. Therefore my superpower came as a bit of a shock. However, it appears that I have supervision. A special power to find things that are often right infront of my boys. Yet they, with perfectly good eyesight, can't see them.


Middle man is all for utilizing my special powers. He is Lego mad, just like his Mummy. I was so pleased when he asked for a giant set for Christmas. It would be something we could work together on. Build together and bond as mother and son. As he unwrapped it on Christmas day, you could see his excitement. He turned to me and said:


"You can help me if you like Mummy."


"Oh yes, I would love to!" I exclaimed.


"Yes. You can be my chief Lego piece finder."


"Hmmm. 


Thanks. So what is your parenting superpower? npower are partnering with Emily and Peter Andre who will be seeking parents with amazing superpowers throughout the UK.
Here is a little video to give you and idea of what they are looking for:


npower are keen to know what your parenting super powers are. There are three amazing UK theme park resort breaks as prizes. All you need to do is to visit www.familysuperpowers.com or tweet them @npowerhq and share an image or video of your super powers using #familysuperpowers.


I am a member of the Mumsnet Bloggers Panel, a group of parent bloggers who have volunteered to review products, services, events and brands for Mumsnet. I have editorial control and retain full editorial integrity. I will receive a voucher as a token of thanks for this post.

Thursday, 2 February 2017

Malteaser Cupcakes With MaltEaster Mini Bunnies

These Malteaser cupcakes With MaltEaster Mini Bunnies are sure to put a smile on everyone's face this Easter. The cupcakes are Malteaser flavoured with crushed Malteasers inside and the grass frosting is malt flavoured too.

Malteaster bunny cupcakes

The hardest thing about making these cupcakes, is not eating all the MaltEaster bunnies before you put them on the cupcakes!

I used the grass nozzle from my piping kit. It is really simple to do. You just need to apply pressure and release. Luckily you tube is always on hand for cake decorating tips if you still aren't sure.

eating malteaser cupcake

Malteaser Cupcakes With Malteaser Mini Bunnies


Makes 12 cupcakes

For the cupcakes
  • 4oz butter
  • 4oz caster sugar
  • 2 egg
  • 3 oz self raising flour
  • 1/4oz cocoa powder
  • 3/4 oz horlicks
  • A handful of smashed Malteasters
For the frosting
  • 200g icing sugar
  • 100g butter
  • 2tsp horlicks
  • Green food gel - I use colorsplash
  • Grass icing nozzle
  • MaltEaster Mini Bunnies
  • Sugar flowers
  1. Preheat the oven to 180C. 
  2. Mix all the cake ingredients together. I find that it is easier if the butter is melted in the microwave first.
  3. Divide the mixture between 12 cupcake cases.
  4. Bake until a skewer comes out clean. Allow to cool before adding the frosting.
  5. To make the  frosting mix the icing sugar, butter, horlicks and green colouring together using an electric whisk. It needs to be quite soft to be piped using the grass nozzle.
  6. Pipe the grass effect over the cupcake. Add a MaltEaster mini bunny to the top and a sugar flower to the side.
Malteaser bunny easter cupcake


Nearly too cute to eat....but only nearly!

Pin it for later:

easy to make easter cupcakes using Malteaser bunnies. They have green grass malt flavoured icing


Casa Costello