October 2016

Sunday, 30 October 2016

Black Forest Meringue Cake

Black Forest Meringue Cake

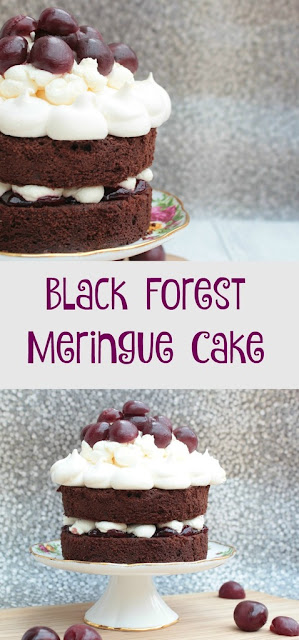
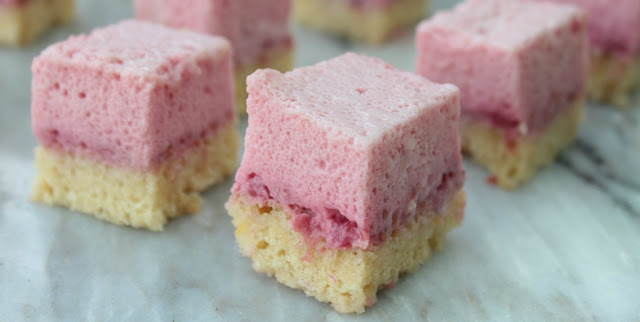
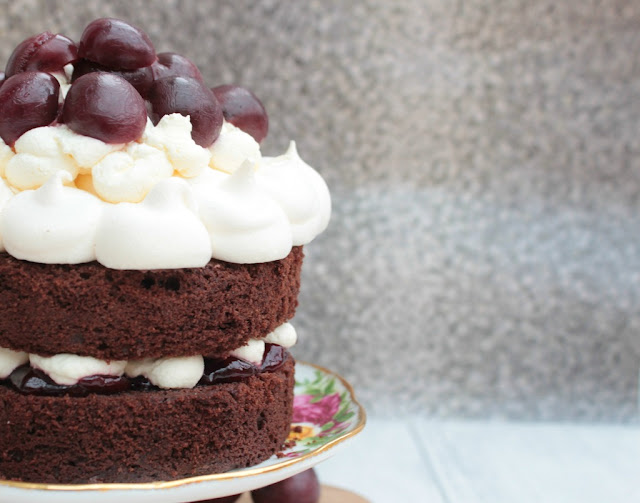
This Black Forest Meringue Cake is fit for a Queen (as well as my 3 boys!) It is a chocolate sponge sandwiched together between morello cherry jam and cream. On top is chocolate spread and a meringue with fresh cream and cherries. I couldn't get any fresh cherries as they aren't in season, but the tinned cherries worked well. Just make sure you take out the stones!


I should point out that as I do a lot of baking, this is only a small cake (using a 5inch cake tin.) For a Normal sized 8 inch cake you will need to double the ingredients. The merguine should be ok as it is. This make two tops for my cake. ( I wanted a spare incase one broke - which it did!)


Black Forest Meringue Cake

  • 4oz butter
  • 4oz caster sugar Sugar
  • 1oz cocoa powder
  • 3oz self raising flour
  • 2 medium eggs
  • 300ml double cream (for the inside and top of the meringue.)
  • Chocolate spread
  • Morello cherry jam

  • For The  Merguine 

  • 2 egg whites
  • 125 g caster sugar
  • 1/2 tsp cornflour
  • 1/2 tsp white wine vinegar
  • Cherries
  1. Mix all the cake ingredients together and put in 2 lined 5 inch round cake tins. Bake at 180C until  a skewer comes out clean. Allow to cool.
  2. Sandwich the cakes together with the cherry jam and whipped double cream. Spread chocolate spread on the top of the cake.
  3. To make the meringue, heat the oven to 120C. 
  4. Whisk the egg whites until stiff and slowly add the caster sugar, cornflour and vinegar.
  5. Draw a pencil circle the size of your cake on the back of some baking parchment. Pipe the meringue onto the parchment.
  6. Cook for 1hr, then turn off the oven and leave the meringue in there.
  7. Place on top of the cake and add cream and cherries.


Pin it for later:

black forest meringue cake. Chocolate cake sandwiched together with cherry jam and cream and topped with meringue and cherries


Casa Costello


Mummy Mishaps

Thursday, 27 October 2016

Toffee Apple Cocktails For Bonfire Night

With Bonfire Night around the corner I thought I would share this Toffee apple cocktail recipe. Now I am well aware that you can buy toffee vodka. However, if like me you aren't a massive vodka drinker and just have some Smirnoff kicking around your cupboards, you can make your own. Infact from my endless browsing on Pinterest you can also flavour it with candy canes for Christmas!


Toffee Apple Cocktails

  • Vodka
  • Werther's Originals
  • Applietiser
  • Ice
  1. To make the toffee vodka, I sterilized a jar and then filled it half full with Werther's Originals.
  2. Give it a good shake and leave it for a few days for the sweets to dissolve. I did give it a mix after a couple of days as the sweets were stuck to the bottom.
  3. Pour a shot of vodka into a cocktail glass
  4. Add ice
  5. Then fill to the top with Appletizer. If you are feeling virtuous add a slice of apple as it is always good to have fruit.

Perfect Autumnal treat for Bonfires night (or any weekend!)

Pin it for later:


Tuesday, 25 October 2016

Gingerbread Mummies for Halloween

After the success of my Surprise Inside Mummy Cupcakes, I decided to make some Gingerbread Mummies. These are great to get the children decorating and if you haven't got the time to bake your own gingerbread you can just buy them from the supermarket. I used a standard gingerbread recipe from Baking Mad and decorated them with mini smartie eyes.

gingerbread mummies

Gingerbread Mummies

  • 50g Muscavado sugar
  • 100g butter
  • 5tbsp golden syrup
  • 225g plain flour
  • 1/2tsp bicarbonate of soda
  • 2tsp ground ginger

  • For The  Decoration 

  • Icing Sugar
  • a few drops of water
  • mini smarties
  1. Mix all the gingerbread ingredients together, making sure that the muscavado sugar is not in clumps.
  2. Place in the fridge for 20 mins to harden.
  3. Roll out the gingerbread and cut out the gingerbread men shapes.
  4. Place on baking parchment and cook at 180C until golden brown.
  5. Allow to cool and mix together some icing sugar with water so a thick icing is formed. Place into a piping bag with a small round nozzle.
  6. Pipe bandages on the arms and legs and then the rest of the gingerbread mummy.
  7. Finish by adding mini smarties eyes and a small blog of icing in the middle. 
Perfect for a Halloween party or an activity this half term.

Pin it for later:
easy to make gingerbread mummies for a halloween party

Sunday, 23 October 2016

After Eight Fondant Fancy

Today I bring to you an after eight fondant fancy. It was meant to be lots of small ones. However, life is short. If you are going to make your own fondant fancy I strongly suggest you make a big one and cut it up! It is so much easier and this recipe will make two rectangles which will make 6 generous portions. 

After Eight Fondant Fancy


I popped to Tesco to get all the ingredients I needed for the bake. I already had some green colouring which I used, but if you need to buy some I would highly recommend buying a gel.

One of the biggest things I learned by making this fondant fancy, is to treat it in the same way as making cake pops. It is much easier to work with the cake when it is hard, so pop it into the freezer for 20 minutes so that it goes cold and the butter icing is easier to spread.

I guess the bigger you make the cake the easier it is, so you could always double this recipe and make one giant fondant fancy!


After Eight Fondant Fancy

  • 4oz butter
  • 4oz caster sugar Sugar
  • 1oz cocoa powder
  • 3oz self raising flour
  • 2 medium eggs

  • For The  Decoration 

  • 150g Butter
  • 300g Icing Sugar
  • a few drops of peppermint essence
  • Fondant icing
  • Green food gel
  • After eight selection
  • a few squares of dark chocolate to melt.
  • Chocolate spread
  1. Mix all the cake ingredients together and put in a lined 8 inch square tine. Bake at 180C until  a skewer comes out clean. Allow to cool.
  2. Cut the cake in half and sandwich together with the chocolate spread. Then pop this in the freezer for 20 minutes.
  3. Mix the butter, peppermint essence and icing sugar together with a small amount of water to make the butter icing.
  4. Take the cake out of the freezer and cut in half length ways. Add butter icing to the tops and sides and pop back in the freezer.
  5. Take some fondant icing and mix with some green gel. Then roll out and cover the cold cake in fondant.
  6. Melt a small amount of dark chocolate and drizzle over the cake.
  7. Finish by adding the after eight chocolates to the top. 
After Eight Fondant Fancy

Mummy Mishaps
Link up your recipe of the week


Casa Costello


Thursday, 20 October 2016

Surprise Inside Halloween Mummy Cupcakes

These Halloween Mummy cupcakes are sure to give your guests a surprise this Halloween. They are easy to make with some ready made icing and smarties. Then bite inside to get a surprise!

Surprise Inside Halloween Mummy Cupcakes


Each cupcake is filled with some strawberry jam bit cutting a round in the cake.

jam filled cupcakes

Once covered with buttercream and the icing bandages the jam can no longer be seen. 

making halloween mummy cupcakes

A couple of smarties and an icing pen, finishes off these Halloween Mummies. They are both a trick and a treat!

surprise inside halloween Mummy Cupcakes

Surprise Inside Halloween Mummy Cupcakes  Cupcakes

  • 4oz butter
  • 4oz caster sugar Sugar
  • 4oz self raising flour
  • 2 medium eggs

  • For The Mummy Decoration 

  • 150g Butter
  • 300g Icing Sugar
  • Smarties
  • A chocolate icing pen
  • White ready made icing
  • Strawberry jam
  1. Mix the cupcake ingredients together and divide between 12 cupcake cases. Bake at 180C until golden brown and a skewer comes out clean.
  2. Mix the butter and icing sugar together with a small amount of water to make the butter icing.
  3. Cut a circle in the middle of each cupcake. Fill with jam and place the cake back in.
  4. Cover each cake with buttercream.
  5. Roll the icing and cut a circle the same size as your cupcake. Cut this into strips and place on your cake. Trim where necessary.
  6. Use the icing pen to stick on two smarties for eyes and add pupils.


If video is more your thing then I have made a short one here shoeing you how I decorated them,


Link up your recipe of the week


Casa Costello


Tuesday, 18 October 2016

Win £500 Pizza Express Voucher With A Spooky Face Pizza

Who would like to win a £500 Pizza Express gift card? *Jumps up and down with hand in the air* Well you have to be quick! This fun competition ends 19th October. All you need to do is create a spooky face pizza. You can make it, draw it or write about it. Your choice, but it does need ingredients that pizza express use.


I have been at my local Pizza Express doing just that. Yes I have been having a pizza making party for one so I could make my very own spooky face pizza.

making pizza

Whilst I don't think my Jack O Lantern will be winning too many prizes, I can confirm it tasted fantastic.

I used a combination of mushrooms and black olives for the actual face. Then mozzarella and pepperoni for the rest of the pumpkin. Some basil to the top and I was nearly there. The manager *may* have helped me a little by suggesting some peppers to make it look more like a pumpkin. I had never tried these before, but my they are tasty.

So here is my finished spooky face. Can you do better? Probably! Just head over to the Pizza Express site to get all the details and make your own pizza for tea!


Whilst I was there I also had a quick look at their Autumn menu whilst I was waiting for my pizza to cook. Let's just say I think I will be returning pretty soon to try out The Molten Magic Chocolate Fondant!

Anyway without delay, get drawing or making your pizzas to enter. All details can be found here.
Good Luck!


In collaboration with Pizza Express


Sunday, 16 October 2016

Crackling Bonfire Cupcakes

These crackling bonfire cupcakes are easy to make and perfect for a fireworks night celebration. I chose to use honeycomb matchmakers and the addition of popping candy make them even more fun to eat.
crackling bonfire cupcakes


Crackling Cupcakes

  • 4oz butter
  • 4oz caster sugar Sugar
  • 4oz self raising flour
  • 2 medium eggs

  • For The Bonfire Decoration 

  • 150g Butter
  • 300g Icing Sugar
  • orange food colouring gel
  • 1tbsp cocoa powder
  • Popping candy
  • Honeycomb Matchmakers
  1. Mix the cupcake ingredients together and divide between 12 cupcake cases. Bake at 180C until golden brown and a skewer comes out clean.
  2. Mix the butter and icing sugar together with a small amount of water to make the butter icing.
  3. Take a third of the mixture and add orange colouring to it. This will be the flames.
  4. Take the rest of the mixture and add the cocoa powder.
  5. Put the chocolate butter icing into a piping bag and make a high swirl in the centre of each cupcake.
  6. Break the matchsticks up and arrange them around the swirl as a bonfire.
  7. Sprinkle each cake with popping candy.
  8. Finish the cakes by piping small orange flames.
making bonfire cupcakes

When making these cakes it is important to use orange gel rather than a liquid food colouring. The later will make the icing taste bitter. I use the colour splash gels. You can now buy popping candy in the baking sections at a lot of the supermarkets if you can't find it in the sweet section.

Are you off to a fireworks party this year?


Pin it for later:

easy to make bonfire cupcakes that crackle when you eat them thanks to the addition of popping candy

Saturday, 15 October 2016

Chicken And Chorizo Lattice Pie

This chicken and chorizo pie recipe is rich and tasty. Not one to try if you are on a diet. I chose to make a lattice as I am not keen on loads of pastry and it also cuts down on a few of the calories. I chose to serves it with a mix of green beans, peas and sweetcorn.

Chicken And Chorizo Lattice Pie

Again this recipe is easily adaptable. As my boys aren't keen on anything too spicy I just made them plain chicken ones.

Chicken And Chorizo Lattice Pie 


           Serves 4
    For the Pastry

  • 100g Butter
  • 225g Plain pastry
  • Pinch of salt
  • egg to wash

  • For the filling 

  • 500g diced chicken.
  • 175g diced chorizo
  • 300ml double cream
  • 1dsp mild chilli powder
  • 1 chicken oxo cube
  1. Start by cooking through the chicken and chorizo.
  2. Add the cream, chilli powder and oxo cube. Divide into 4 pie dishes.
  3. make the pastry by rubbing the butter and flour together. Add the salt and slowly add some water to combine.
  4. Roll out and cut into strips.
  5. make a lattice over the pie dish and brush with egg.
  6. Cook at 180C until golden brown.


This is a real treat and perfect for a winters evening.

Pin it for later:
chicken and chorizo lattice pie is a perfect winter treat. Rich and full of flavor.


Mummy Mishaps

Friday, 14 October 2016

A Sprint To The Grave

So here is the deal. Yesterday at school pick up I heard some other Mum's chatting.

"Well it's Harvest Festival next week." one exclaimed.

I smugly laughed to myself as they were clearly confused. Harvest festival isn't until the middle of October. Right by half term. Oh crap!

I am not sure how it is nearly half term. I mean it was only Christmas a couple of months ago.

I am not ready. My baby has only just started school. I am supposed to be getting organised. I feel less organised now he is at school than when he was at home. I haven't even had time for the daytime TV binge fest I had planned.

Where is time going? Will it ever slow down? Am I now on a constant sprint to the grave?

Part of me wants a time turner and the other part just wants to stop time. To take a breath and appreciate my not so little boys. They are changing so fast. I can hardly keep up.

I want to remember the little things.

Little man and his skipping. "When I am happy I skip Mummy. When I am really happy I skip really fast."

Middle man contemplating "who I will be married to in 20 years?"

Big man and his loom bands. Yes you have read that correctly. The craze that ended 2 years ago is still alive in this house. Mainly thanks to big man's entrepreneurial skills of managing to get my sisters friend to give him a pound for the one he made her so that he could make more.

These things wont last forever. But sometimes I wish they would. I get all melancholy. Then out of the blue I am reminded that them growing up isn't all bad. Little man comes home with 5 cereal packets hanging together by sellotape.

"It's a robot Mummy"

I smile and say "Oh Wow! How great!" whilst thinking how can I get that in the recycling without him noticing.

Maybe time can slow down once he has left the junk modelling world of reception.


So is it just me or does time really go faster the older you get?


Bubbablue and me school days linky

Thursday, 13 October 2016

Slow Cooked Meatballs With Chilli Cheese Centre

These Slow Cooked Meatballs with chilli cheese are a great weekday meal. If like me, you have children that aren't keen on too much flavour you can make mozzarella or leave them plain. You can either make the dish in two stages or just put it all in at once. If you do the later I suggest that you use a low fat mince as otherwise there will be lots of fat in your sauce.

Slow Cooked Meatballs With Chilli Cheese Centre


Slow Cooked Meatballs With Chilli Cheese Centre 

  • Scotch Bonnet And Red Pepper Cheese
  • 500g beef mince
  • 1 slice of bread 
  • 1 medium egg
  • 2 tins of chopped tomatoes
  • 1 oxo cube
  • 1tbsp caster sugar
  • 1tbsp balsamic vinegar

  1. Set your slow cooker to low.
  2. Cut the cheese into small cubes. It is quite a soft cheese so you should then be able to roll these into little balls.
  3. Blitz the slice of bread in a food processor so that you make breadcrumbs.
  4. Combine the breadcrumbs with the mince, bread and egg.
  5. Use this mixture to wrap the meat around the cheese and place in the slow cooker for a few hours.
  6. Remove any excess fat and then add the tomatoes, sugar, vinegar and oxo cube.
  7. Cook for a further 30 minutes and serve of pasta of your choice.


Wednesday, 12 October 2016

Woodland Walks And Indoor Picnics

One of the challenges in autumn is the weather. One minute the sun is beating down, the next it is pouring with rain. I often find myself on the school run in my thick winter coat and boots. Others in their flip flops. It is a season where you have to make the most of the weather and get out and about when you can.


Last week the weather fooled me into it being a nice day. Well it was a nice day. The boys finished school and we went for a walk in the woods. Little man was excited by the pine cones and conkers that he found on his travels. He wasn't too sure about these prickles though!


We arrived home with the sun still shining and I prepared a little picnic. To mix things up a little I made some chicken and pastrami wraps. I also made some fruit skewers with some plastic cake pop sticks. These were great by themselves but the boys also enjoyed dipping them in the Little Yeos yoghurts.


So all was ready for our outdoor picnic. I called the boys to wash their hands. And with that dark black rain clouds appeared. Fear not. A few blankets were bought downstairs and we had a picnic there instead.

The boys loved the Little Yeos, and with all natural ingredients, so did I. Sometimes it is the simple pleasures in life that are the best. My plans hadn't quite gone as I had hoped but the boys enjoyed their walk outside and the indoor picnic.

As little man had collected some leaves and sticks on our walk we then made some autumn themed pictures. He loves crafting at the best of times but when nature is involved it is even better!


What do you do to make the most of autumn? Have your little ones discovered Little Yeos yet?


This is a commissioned post

Tuesday, 11 October 2016

Bonfire Craft

When I saw that this month's Bostik bloggers challenge was bonfire themed I knew exactly what craft little man would  like to make. He loves collecting sticks and often insists on bringing them home, so I thought I would combine this into a crafting opportunity.

bonfire craft

Whether you like it or not, autumn is well and truly here. I find it a hard time to entertain the boys. If the weather is nice after school then we need to make the most of being outside. Whether it is a trip to the park or a walk in the woods. Last week we went on a woodland walk and little man was in his elements. Any Mum of boys (and probably a lot of girls) will know that they love sticks. Well little man loves sticks, pinecones, dead leaves. You name it, he picks it up and wants to bring it home. On this occasion he was in luck as I said yes! We could use his hoard in some crafting.

To make your own bonfire night picture you will need:

craft supplies for bonfire craft


A collection of sticks from a woodland walk
Black card
Bostik white glu
Yellow tissue papers and orange feathers to make flames
Sparkly pom poms
Bostik glitter pens

Start my using the white glu to stick down the feathers and tissue paper to represent flames.

Then use the white glu liberally to stick on the sticks that you have collected. Some may need to be broken into smaller pieces.


Stick on some sparkly pom poms which are the centre of  the fireworks.

Use the glitter pens to make the fireworks explode.

A simple craft for children of all ages with the added bonus of a walk in the woods collecting interesting sticks!

What bonfire crafts would you recommend?

Sunday, 9 October 2016

Raspberry Mousse Cake

Raspberry mousse cake was a bit of a risk for this week's Great Bloggers Bake Off. Firstly, I had never made a raspberry mousse cake before. Secondly, I had never made a genoise sponge before. And thirdly I had only ever made a cheats orange mousse before.

Raspberry Mousse Cake


However, knowing that my orange mousse sets well I decided it would probably work in raspberry and therefore as long as the sponge went ok, it should stand up. I am pleased to say that it did. Again to make my life easier I made an 8 inch sponge and then cut it into smaller squares. The raspberries I used sunk to the bottom, creating a thing layer between the sponge and mousse. I would love to say that I had planned it this way, but I hadn't. It was more due to my impatience of waiting for the jelly to set. But it seemed to turn out as an added bonus.


Raspberry Mousse Cake

    For The Genoise Sponge 
  • 65g Plain Flour
  • 65g Golden Caster Sugar
  • 12g Melted Butter 
  • 2 medium eggs

  • For The Raspberry Mousse 

  • 1/2 packet raspberry Jelly
  • 1/4 boiling water plus 1/4 pint cold water
  • A Handful Of Raspberries 
  • 100ml evaporated milk

  1. Preheat the oven to 180C.
  2. Whisk the eggs and sugar for 10mins.
  3. Fold in the flour and melted butter.
  4. Pour into a square 8inch cake tin.
  5. Bake at 180C until golden brown and a skewer comes out clean
  6. Allow to cool. Then add foil to the cake tin and put the cake back inside. This is so you can easily remove the cake with mousse once it is set.
  7. To make the mousse, make up 1/2 packet of raspberry jelly. Pour the evaporated milk, raspberries and jelly into a mixer and whisk until light and frothy.
  8. Place the cake into the freezer for 10 minutes to get cold and place the mousse mixture into the fridge to start setting.
  9. After 10 minutes place the mousse on top of the cake and place back into the fridge to set.
  10. Cut into smaller cakes and enjoy.


Saturday, 8 October 2016

Dear Merlin Customer Services

Dear Merlin Customer Services

We have loved our Merlin passes. Yes they are expensive but also great value. I have given you loads of free exposure from our days out. I guess that's why I am so annoyed. I have been loyal to you. Spreading the word that Merlin passes are great. Like many pass holders do.

Today, however, you have made me feel worthless. Just a number and not a person. You see I am by myself this weekend with my 3 young boys. We had arranged to meet a friend at Chessington. We were about to leave when I realised my husband had taken 2 of their passes. But hey, they have serial numbers on them. We queue at annual pass booths for hours to get their picture put on. In this day and age you must be able to check that we have them on your computer.

No.

No pass, no entry.

"You can get a friends and family rate."

It might say it in the terms and conditions Merlin, but that doesn't mean it is right.

What is the point of the card with a photo and all the details if there isn't any help when a mistake happens? Why can't you say pay full price entry. Then once you have confirmed that we aren't the lying thieving scum that you thought we were, you would offer a refund?

You have disappointed my boys today, but me even more.

A company I once raved about is now a company that has reduced me to tears of frustration. One that is unwilling to help. One that would rather charge me twice for entry than look into the pass numbers and confirm that we do have passes.

It is lazy and it is bad customer service.

Regards

One disappointed premium annual pass holder.


Friday, 7 October 2016

Win Pudsey And Friends CBeebies DVD!

Pudsey and Friends CBeebies DVD is being released by Abbey Home Media to help raise money for this year's Children in Need appeal. All your little one's favourite CBeebies characters in one DVD and a £2 donation to Children in Need for every DVD sold.

For the very first time BBC Children in Need, and Abbey Home Media are bringing together all your favourite CBeebies shows on DVD to help disadvantaged children and young people throughout the UK. Dontaions from the purchasing of the DVD will go towards, helping children and young people across the UK have a safe, happy and secure childhood and the chance to reach their potential. This donation has been made possible through the generosity of the many companies and individuals involved who have either contributed their shows or services to this unique project with no charge.


Pudsey and Friends DVD has 15 episodes for your little ones to enjoy including Octonauts, Bing, In the night garden and The Furchester hotel. The DVD goes on sale on Monday 10th October and can be pre ordered from Amazon.


This years children in need show will take place on 18th November and for more information on how to take part and donate you can head to their website.

To raise awareness of this lovely DVD and such a good cause I am pleased to be able to offer one of my readers the chance to win a copy of Pudsey and Friends on DVD. Just complete the Gleam Entry below. Good Luck!

Pudsey and Friends


SuperLucky Blog Giveaway Linky
Listed of Prizefinder

Sunday, 2 October 2016

Caramel Filled Cupcakes

These caramel filled cupcakes were quick to bake and decorate, so will have to be this weeks Great Bloggers Bake Off entry. I really wanted to make a lemon meringue pie but just haven't had the time this week. As we are now in October (how did that happen?) I went for some Autumnal colours for the flowers and leaves.


The sugarcraft icing can be made in advance and for more information on the products I use, you can visit my English Rose Cupcakes post. Silicon moulds are so easy to use and can be picked up at a good price on ebay or a cake shop.

For these cupcakes I just used a standard cupcake recipe, but as I had some carnation caramel left over from my caramel apple cake, I decided to cut out the middle of the cupcakes, fill them with caramel and then put the cake top back on. Then when covered with buttercream, you can't see it is there and get a nice surprise when you cut into the cake.


The icing flowers can be stuck together using edible glue and then popped onto of the piped buttercream.


Mummy Mishaps

Saturday, 1 October 2016

Caramel Apple Cake Recipe Using The Kenwood Pattissier

Caramel and apple cake transports me to autumn and this recipe got a big thumbs up from the entire family. A bit like a carrot cake made with apples, and filled with rich caramel buttercream, it is the perfect show stopper for a bonfire night party.

caramel apple cake

I was extremely excited when AO.com asked if I would like to take part in their Show Us Your Show Stopper Challenge and using a Kenwood Pattissier to help with the bake. I have never owned a food mixer before and you can see how I have found it by watching this short video.


I can see myself making good use of this little beauty, and as I am a big baker, I am not sure why I have waited so long to get one!

Caramel Apple Cake

  • 300g Self Raising Flour
  • 250g Light Brown Sugar
  • 200ml Vegetable Oil
  • 3 medium eggs
  • 300g grated eating apples
  • 1tbsp Ground Cinnamon
  • 1tsp Ground Ginger

  • For the Caramel Butter Cream

  • 150g Butter
  • 300g Icing Sugar
  • 150g Carnation Caramel

  • For the Toffee Apple Decoration

  • 4 tbsp Golden Caster Sugar
  • A Drop Of Vinegar
  • 1 tbsp Golden Syrup
  • 1 apple sliced
  1. Whisk the flour and sugar together.
  2. Fold in the rest of the cake ingredients.
  3. Line and grease 3 x 20cm Spring form pans and share the mixture between these.
  4. Bake at 180C until golden brown and a skewer comes out clean.
  5. Allow to cool.
  6. To make the buttercream, mix the butter, icing sugar and caramel together and use it to sandwich and top the cake.
  7. The toffee apple decoration is probably the hardest part of the cake! I followed this recipe.


Pin it for later:

caramel and apple cake


Link up your recipe of the week


Casa Costello